Checkerboard inlays and cork slicing
Posted by:
Mikko Stenberg
(---.kyamk.fi) Date: August 04, 2005 07:49AM
I am planning in starting to make those cool checkerboard inlays to my fly grips. I have an access to some nice machinery and people who can use them so I am planning to make jigs for the job - a cork slicing jig and a checker jig. I've seen the pics at the "photos" of Mike Barkley's jigs. These jigs will be the basis for the jigs that I'm planning. Not sure if those are the best jigs out there - any improvements anyone?
[ www.rodbuilding.org]
[ www.rodbuilding.org]
I've also read plenty concerning the topic from the board but still have some guestions.
Are the jigs supposed to be just snug enough so that the cork rings stays firmly in place? Or is there other ways to make sure that the rings wont move while cutting/sawing/slicing?
I assume that when one cuts the cherkerboard pieces in the jig one does not go all the way through with the saw to keep the ring still as a one piece?
Refering to the previous guestion - should I first slice the cork rings and then cut the cherker sector pieces or wise versa?
How many channels would be a good idea to machine to the cherker jig without making the job too difficult - i.e. how many piece checkerboard is still relatively easy to put together?
Cheers!
Edited 2 time(s). Last edit at 08/05/2005 08:32AM by Mikko Stenberg.
Re: Checkerboard inlays and slicing cork
Posted by:
Mike Barkley
(---.nap.wideopenwest.com) Date: August 04, 2005 09:19AM
Mikko,
The rings are fairly snug in the hole.
You DO cut the rings all the way through and remove them piece by piece. Some number the pieces with a marker so that they are assembled in the same order thay were cut in (I haven't done this).
Depends how thick you want the checkers. For example, I slice a piece of "burnt cork in half and a piece of Burl in half and then glue 1 piece of each together. When they are cured, I then cut into wedges and when I re-assemble them, I reverse every other piecce.
You can make even thinner pieces by inserting 1" washer(s) in the jig behind the cork ring. You can also mix in colored EVA foam or just about anything.
You can put as many channels as you want because you only have to use as many as you want each time. The commercial jig has 4, enabling you to cut 2, 4 or 8 wedges.
It is important not to make the channels only wide enough for the saw blade to fit. Use a "Flush Cut" or Japanese" saw. They are fairly thin and cut on the back stroke whick helpd keep the thin blade frrom bending/binding.
The commercial ones are machined aluminum and are available from Custom Tackle Supply.
Good luck and let us know how it goes. Post a pix!
Mike
Re: Checkerboard inlays and slicing cork
Posted by:
bill boettcher
(---.an2.nyc41.da.uu.net) Date: August 04, 2005 10:39AM
I have cut each slice not all the way though and found I can line a slice up again if it moves making all my cuts and then finishing them up.
Re: Checkerboard inlays and slicing cork
Posted by:
Stan Grace
(---.hln-mt.client.bresnan.net) Date: August 04, 2005 11:00AM
I have experimented and found Bill's method helpful in keeping alignment and maintaining uniform wedges. I cut approximately 90% through until I have all cuts made and then complete the scored slices.
Stan Grace
Helena, MT
"Our best is none too good"
Re: Checkerboard inlays and slicing cork
Posted by:
Mikko Stenberg
(---.kotopas.fi) Date: August 04, 2005 11:13AM
Thanks for the info Mike!
I'm not sure if I got it right. Do you meen that one basicly needs only one channel because one will only use one channel at a time and cut the ring in half each time not creating more than two pieces? I hope it goes like that or otherwise I might have figured out an additional way to do it. ;)
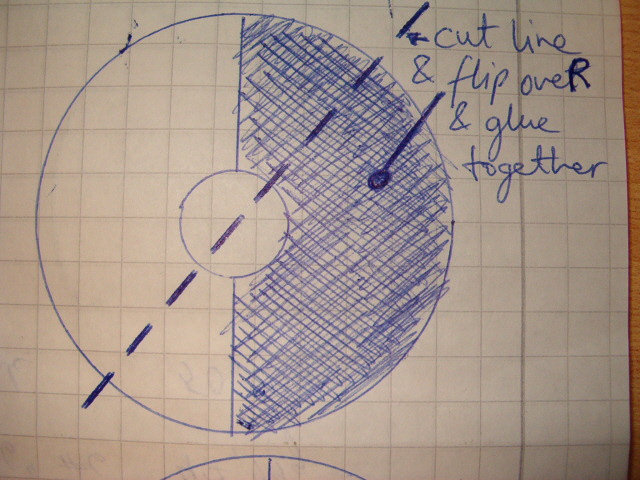
Goes something like this. So you have two identical thickness slices of say regular and burl cork. You cut both of them one at a time in half creating two "moon" shaped pieces from each ring. ;) One half a ring of both are glued together so that one will have a ring that has one side burl and the other obviously regular cork. Then one places this ring into the jig again, sets it into position so that it will define the size of the cut wedges, cuts it in two again creating the first two "fixed wedges", one of burl and one of cork on opposite sides of the ring. Then one turns the other half over, glues the halves togerher and continues on.? Is this the way? Atleast it might work this way - the only problem I see is that the diameter of the ring is slightly reduced by each cut and that the cut would need to be exactly even.
Had a though of this idea and it would be relatively easy to create something different from the regular even angle symmetrical "wagon wheels".
Just an idea:
[ www.rodbuilding.org]
Thanks for Stan and Bill as well who were apparently typing at the same time as I. :D
Edited 5 time(s). Last edit at 08/04/2005 04:20PM by Mikko Stenberg.
Re: Checkerboard inlays and slicing cork
Posted by:
Mike Barkley
(---.nap.wideopenwest.com) Date: August 04, 2005 11:24AM
Mikko,
Now you have me confused (not hard to do)!!. There are 2 different jigs. This one for checkers/diamonds [ www.rodbuilding.org] and this one for slicing thinner rings [ www.rodbuilding.org]
Hope this helps!
Bill, Stan, Great idea! Thanks!!!!!!!!
Mike
Re: Checkerboard inlays and slicing cork
Posted by:
Billy Vivona
(4.43.114.---) Date: August 04, 2005 11:47AM
If you are going to make those cuts then glue the half moons together, then cut & glue - I hope you aren't using slow cure epoxy for this. You might want to consider WEldwood Contact cement as you can glue teh joints up in a few minutes after cutting.
Re: Checkerboard inlays and slicing cork
Posted by:
Steven Libby
(---.dc1.textron.com) Date: August 04, 2005 12:04PM
[ www.fishingphotos.net]
when I 1st started out i had some tooling i inherited and didnt know what it was.
as it turned out its a nice jig, which has worked out very well see the phot attached.
hope this helps
Re: Checkerboard inlays and slicing cork
Posted by:
Mikko Stenberg
(---.kotopas.fi) Date: August 04, 2005 12:21PM
Mike Barkley Wrote:
-------------------------------------------------------
> Mikko,
>
> Now you have me confused (not hard to do)!!.
> There are 2 different jigs.
Heheh! :D This is getting funny!
I understood that there are two different jigs for two different purposes. I guess my explanation was not very clear and that I'm not following you completely. We'll get there I hope.
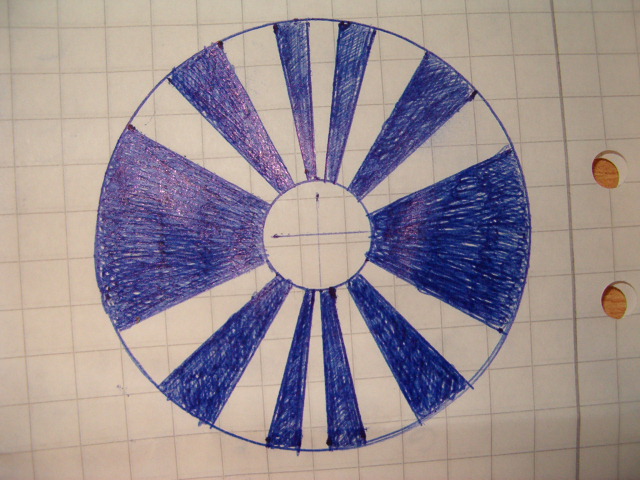
Anyway here are two pics that will hopefully explain my method that I tried to explain above.
Imagine that you have halves of cork and burl rings glued together - not on top of each other but to make one whole ring.
[ www.rodbuilding.org]
[ www.rodbuilding.org]
Edited 2 time(s). Last edit at 08/04/2005 04:22PM by Mikko Stenberg.
Re: Checkerboard inlays and slicing cork
Posted by:
Mikko Stenberg
(---.kotopas.fi) Date: August 04, 2005 12:29PM
Thanks Billy and Steven!
I guess you Billy followed my explanation or that I just simply understood Mikes method.
That's a handy looking jig Steven! So you just take one end of it off, slide a cork ring in, align the channels of the pipe and the aluminium end and make the cuts. The PVC pipe and the shaft keeps the ring together and I guess you can also slide some small pieces of a thin stiff plate into the made cuts to keep the ring and cut wedges steady - eh?
Edited 2 time(s). Last edit at 08/04/2005 04:24PM by Mikko Stenberg.
Re: Checkerboard inlays and slicing cork
Posted by:
Mike Barkley
(---.nap.wideopenwest.com) Date: August 04, 2005 12:43PM
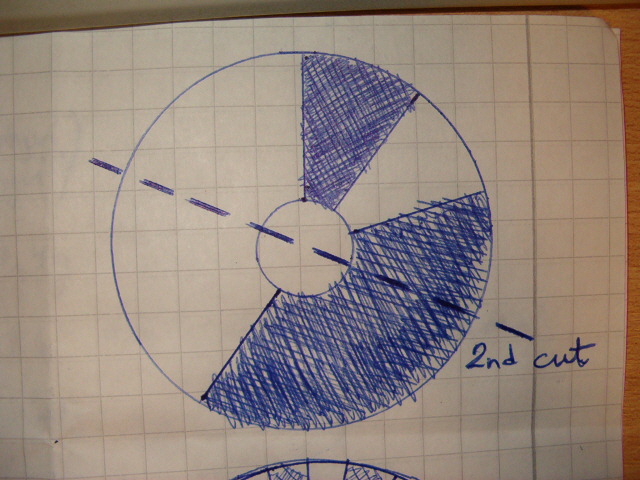
Mikko,
I THINK I see what you are saying but in the 2nd pic it doesn't look like all of the wedges would be the same size. Your checkers would all be 1/2" thick right? If you slice the rings to make them thinner and glue 2 different types up, you could have as many as 8 identical 2 color wedges and by flipping every other piece, you would have an 8 piece checker board. With the slicing jig, you can also slice the rings as thin as you want by inseting washers behind them. I'm pretty mechanically challenged and can't quite visualize your jig (even with your pix) It's me, not you!!!!!
Be sure to post pix when you make it!!
Mike
Edited 1 time(s). Last edit at 08/04/2005 12:44PM by Mike Barkley.
Re: Checkerboard inlays and slicing cork
Posted by:
Mikko Stenberg
(---.kotopas.fi) Date: August 04, 2005 05:19PM
Mike Barkley Wrote:
-------------------------------------------------------
> I THINK I see what you are saying but in the 2nd
> pic it doesn't look like all of the wedges would
> be the same size.
Good that I managed to visualize with the pics how I though the job could be done. ;) I don't know if this is the best way to do it but it might work too. Any new suggestions?
And yes - the drawings are just quick sketches so I didnt bother measuring the angles that well. The result would truly be different sized wedges.
> Your checkers would all be 1/2"
> thick right? If you slice the rings to make them
> thinner and glue 2 different types up, you could
> have as many as 8 identical 2 color wedges and by
> flipping every other piece, you would have an 8
> piece checker board. With the slicing jig, you
> can also slice the rings as thin as you want by
> inseting washers behind them.
Yeah that's a good idea! The slicer makes it easy to get some variation into the checker patterns by having thicker and thinner rings. I fancy Eden Bromfields work so I'll be aiming to something like that - well arent we all. ;) I'll take a humble start though since this will be my first turned grip - I might just not be a natural born Eden! LOL :D
> I'm pretty mechanically challenged and can't quite visualize
> your jig (even with your pix)
Cant blame you since its a bit of a mess still in my head too. ;) Just trying to get some views and ideas from you pros before making the tool.
Edited 1 time(s). Last edit at 08/04/2005 05:23PM by Mikko Stenberg.
Re: Checkerboard inlays and slicing cork
Posted by:
Mike Barkley
(---.nap.wideopenwest.com) Date: August 04, 2005 05:38PM
I'm the last one to be considered a pro!!! I'm a rank beginner when it comes to a lathe and fancy grips but am rapidly becoming hooked!!
Keep us posted and post pix!
Mike
Re: Checkerboard inlays and cork slicing
Posted by:
Mikko Stenberg
(---.kyamk.fi) Date: August 05, 2005 08:39AM
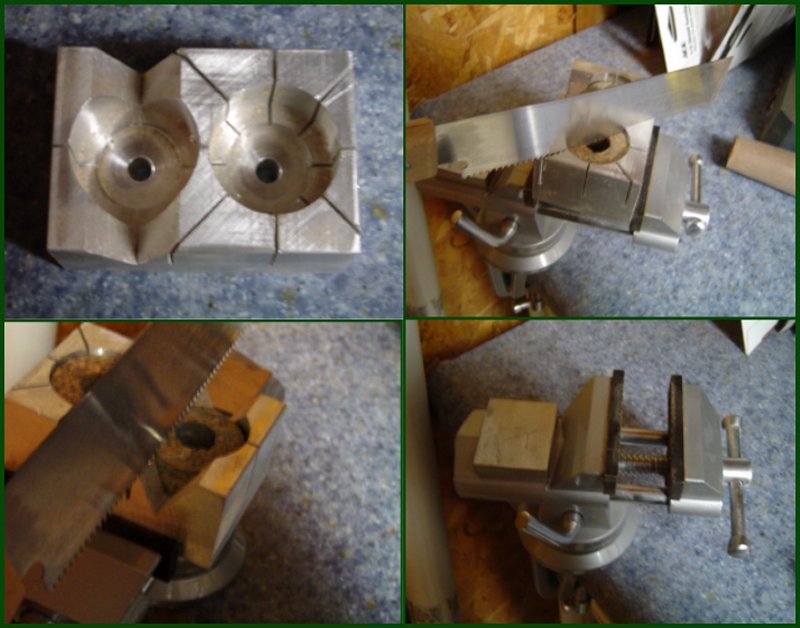
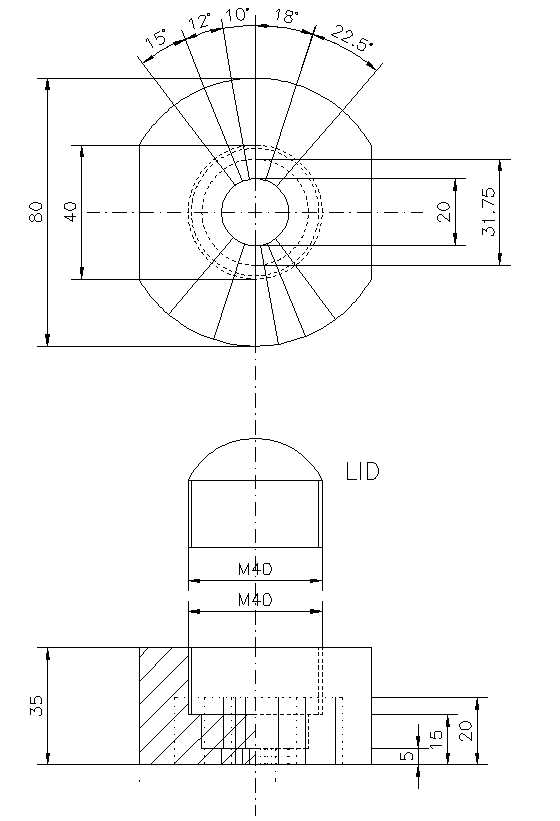
I made a drawing of the jig that I'm planning to make/ to have made.
[ www.rodbuilding.org]
It would have a lid that keeps the ring in place with a small tension when making a cut. The channels are in the bottom of the jig. There are 6 differently angled channels that enable one to make checkerboards with 36, 30,24, 20 and 16 pieces plus one can combine a few of these channels to make a 45 degree cut etc. The ring is cut and then realigned in the jig. IMHO this should give some flexibility to the job but obviously one has to be very precise in realigning the ring. Some pieces of the cutting blade thickness plate could be used as a realigning tools I think.
Any ideas?
Edited 1 time(s). Last edit at 08/05/2005 08:42AM by Mikko Stenberg.
Re: Checkerboard inlays and slicing cork
Posted by:
Mikko Stenberg
(---.kotopas.fi) Date: August 05, 2005 01:26PM
Billy Vivona Wrote:
-------------------------------------------------------
>- I hope you aren't using slow cure epoxy for this. You
> might want to consider WEldwood Contact cement as
> you can glue teh joints up in a few minutes after
> cutting.
Thanks for the tip Billy! Well I was going to use Rodbond but I see what you meen. If I'd make a 36 wedge ring, it would take 36 days to just cut and glue it together! LOL :D
Since I'm from Finland I guess I'll run into problems in trying to find the Weldwood products.? What type of glue is the contact cement so that I could try to find a substitute for it? Maybe I'll try 5min epoxy like someone adviced in the other thread.
Edited 1 time(s). Last edit at 08/06/2005 01:12PM by Mikko Stenberg.
Re: Checkerboard inlays and cork slicing
Posted by:
Billy Vivona
(4.43.114.---) Date: August 05, 2005 02:29PM
Weldwood is a DAP product, which is commonly available in the US. I've actaully gone to glueing up cork rings with it because I am familiar with teh product and know when I can ream and sand after glueing together. I also do not do many cork grips, mostly EVA, but I do dabble with cork enough to know it works well and is quick.
I am not familiar with any other Contact Cements, although I am sure that others work just as well as Weldwood.
Re: Checkerboard inlays and cork slicing
Posted by:
Robert Schuler
(---.delv.east.verizon.net) Date: August 06, 2005 09:43AM
Mikko, Weldwood and Tightbond are "aliphatic resins" and packaged in many brand names around the world. Its a hybrid of white glue, stronger and 50% faster drying. White glue will work but none of the resins are totally water proof. Model airplane hobby shops sell some version of this resin... Bob.
Sorry, only registered users may post in this forum.
|


