I
nternet gathering place for custom rod builders
  • Custom Rod Builders - This message board is provided for your use by the sponsors listed on the left side of the page. Feel free to post any question, answers or topics related in any way to custom building. When purchasing products please remember those who sponsor this board.

  • Manufacturers and Vendors - Only board sponsors are permitted and encouraged to promote and advertise products on the board. You may become a sponsor for a nominal fee. It is the sponsor fees that pay for this message board.

  • Rules - Rod building is a decent and rewarding craft. Those who participate in it are assumed to be civilized individuals who are kind and considerate in their dealings with others. Please respond to others in the same fashion in which you would like to be responded to. Registration IS NOW required in order to post. You must include your actual First and Last name and a correct email address when registering or posting. Posts which are inflammatory, insulting, or that fail to include a proper name and email address will be removed and the persons responsible will be barred from further participation.

    Registration is now required in order to post. You must include your actual First and Last name and a correct email address when registering or posting.
SPONSORS

2024 ICRBE EXPO
CCS Database
Custom Rod Symbol
Common Cents Info
American Grips Piscari
American Tackle
Anglers Rsrc - Fuji
BackCreek Custom Rods
BatsonRainshadowALPS
CRB
Cork4Us
HNL Rod Blanks–CTS
Custom Fly Grips LLC
Decal Connection
Flex Coat Co.
Get Bit Outdoors
HFF Custom Rods
HYDRA
Janns Netcraft
Mudhole Custom Tackle
MHX Rod Blanks
North Fork Composites
Palmarius Rods
REC Components
RodBuilders Warehouse
RodHouse France
RodMaker Magazine
Schneiders Rod Shop
SeaGuide Corp.
Stryker Rods & Blanks
TackleZoom
The Rod Room
The FlySpoke Shop
USAmadefactory.com
Utmost Enterprises
VooDoo Rods

Rod repair
Posted by: Mark Brown (---)
Date: December 21, 2022 06:15PM

Hi, rod repair for ML 6'6 bass rod. Break 13 inches from the tip. Read Ralph O'Quinn on how to fix it. I took off the guides leading to the break and have an oversleeve of just under 2 inches ready. He calls for an undersleeve of just 1/4 inch. Wondering if this is the length you still use? Thanks, mark

Options: ReplyQuote
Re: Rod repair
Posted by: Michael Danek (---.adr01.alma.mi.frontiernet.net)
Date: December 21, 2022 06:26PM

I have only used an undersleeve in a rod that broke in the middle and was essentiallyh shattered, so the internal "spigot" held the pieces together. If a clean break you probably do not need an internal "undersleeve."

Options: ReplyQuote
Re: Rod repair
Posted by: Tom Wewerka (---)
Date: December 21, 2022 08:16PM

Mark I have repaired many, many rods just like that in the same area. On a ML only that far from the tip all you will need is a FIBERGLASS oversleeve. Two inches is a bit long to use, in the tip area. I would try to stay in the 1 1/8 to 1 1/4 inch length. Be sure that wherever you cut it that the same length is above and below the break. Slide the sleeve down from the tip until it is Snug and make your cuts based on that position. Also be sure to file or sand the edge of the sleeve to reduce the modulus in that area. Hopefully you marked the center of the tip section so it matches the guides on the lower end.

I have used 5 minute epoxy to make my repairs, it is thinner that paste and makes for a tighter fit. When done wrap it with A or B thread and cost with epoxy.

Good luck on your repair

Tom

Options: ReplyQuote
Re: Rod repair
Posted by: Chris Catignani (---)
Date: December 21, 2022 08:24PM

Mark Brown Wrote:
-------------------------------------------------------
> Hi, rod repair for ML 6'6 bass rod. Break 13
> inches from the tip. Read Ralph O'Quinn on how to
> fix it. I took off the guides leading to the break
> and have an oversleeve of just under 2 inches
> ready. He calls for an undersleeve of just 1/4
> inch. Wondering if this is the length you still
> use? Thanks, mark

Mark...I think maybe you may have misread something in the article.
This is from the section labeled EXTERNAL SLEEVE"
The external sleeve must ALWAYS overlap the internal plug. A general rule of thumb for the overlap is twice the diameter at the overlap point. I like to round things out to nice even numbers, so I used a 1/2 inch overlap in this instance. Then add almost another 1/4 inch on each end for the taper and you have a sleeve about 3 & 1/2 inches long.
I think you may be thinking of an overlap.
Look at figure #3. There is an internal "plug" in the left rod piece and an external "sleeve" on the right.
From this you can get a good feeling of how there two pieces overlap each other.


Edited 1 time(s). Last edit at 12/21/2022 08:28PM by Chris Catignani.

Options: ReplyQuote
Re: Rod repair
Posted by: Tom Kirkman (Moderator)
Date: December 21, 2022 09:00PM

I have done many this way, but without the internal plug. The rods have held up just fine.

You have to careful of creating a situation where you stiffen the break area to an extent greater than the surrounding area.

...........

Options: ReplyQuote
Re: Rod repair
Posted by: Norman Miller (Moderator)
Date: December 21, 2022 10:13PM

In most cases either an over sleeve or an internal plug will work. I rarely use both at the same time.
Norm

Options: ReplyQuote
Re: Rod repair
Posted by: Mark Brown (---.tic.va.gov)
Date: December 22, 2022 10:48AM

Cut back the oversleeve to about 1.5inches , abandoned the inner sleeve per your suggestions and 15min epoxy used to attach. Smaller sleeve looks good. Thank you all for the help , its always appreciated. -Mark B

Options: ReplyQuote
Re: Rod repair
Posted by: Michael Danek (---.adr01.alma.mi.frontiernet.net)
Date: December 23, 2022 07:19AM

One thing you can do to lighten the repair is to use fine silk thread to wrap only the chamfered ends of the sleeve, and use Perma Gloss instead of epoxy to finish the threads, probably only one coat will do, two max.

Options: ReplyQuote
Re: Rod repair
Posted by: roger wilson (---)
Date: December 24, 2022 07:46AM

Mark,
I have repaired many many rods and always use the same technique.
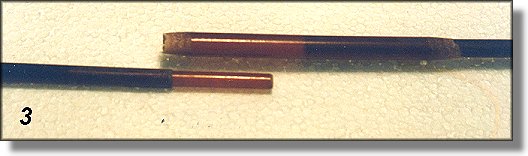
If possible I use a fiberglass inner plug and a fiberglass outer sleeve.

In the case where the rod has been crushed and has a split going back a ways from the apparent break, I will make the plug and sleeve at least an inch longer than the sign of any visible defect.

I always make the plug and sleeve as thin as possible to minimize weight and stiffness of the repair.

For a clean break, I generally have a plug and over sleeve 2-3 inches long. I make a point to never cut either side of a break. Rather, I make a policy to insert all of the broken edges together to add both more gluing area as well as to guarantee the alignment of the rod.

As others have said, I chamfer the edges and minimize the outside of the diameter of the outer sleeve to keep the bulk of the strength of the sleeve, but minimize the weight build up.

I have always used in inner plug on the belief that I do not want the ends of the break crushing together and deforming under a fully flexed and stressed rod.

I will always do a thread wrap of about 3/8th of an inch long at each end of the outer sleeve with a coat of finish on the thread wrap to seal it together.

-------------
I approach the repair of a rod blank in the same way that a carpenter would repair a broken beam in a structure. There needs to be sufficient in the repair to essentially replicate the original strength of the bearm.

After all, that is essentially what is being done - i.e. repairing a structure to have strength at least equal to the original build.

-------------
In the case of a tip break of a very thin tip, I will generally use an appropriate size piano wire to serve as an inner plug. Again, I use the inner plug for the same reason as I use it for any other part of a rod break. i.e. I want an inner support to avoid future crushing damage from a fully stressed rod after the repair.

But, by all means, use the system that works for you, and if repairing for some one else - for the final fishing needs of that particular person.

Note:
To thin an inner plug and or an outer sleeve, I will make the repair pieces 2-4 inches longer than the final pieces. Then, I chuck the pieces into a variable speed drill and hold the spinning pieces against a spinning bench sander. First I thin one end of the repair piece and then, reverse the piece in the drill and reduce the outer diameter of the other end of the piece. Finally, I will cut the thinned repair pieces to the final desired length before doing the final assembly and repair.

Note: for cutting blanks and repair pieces I use a miniature chop saw that turns a 3 inch abrasive disk. Quick and easy.
[www.rodbuilding.org]

I will have the inner plug sized, the outer sleeve sized and prepped and have every thing ready to go.

For the outer sleeve I will always start with the outer sleeve placed in the smaller side of the break, and slid well above the break.

I will coat the inner plug and ends of the break with 5 minute epoxy and slip the rod together making sure that the inner plug stays in its desired position. Then, with the outer sleeve well above the break, I will coat the outside of the rod with a thin layer of epoxy well up the rod so that I can simply slide the outer sleeve down the rod which insures excellent coating of adhesive on both the outside of the rod blank and the inside of the inner sleeve. I slip everything together, do a check on alignment, do a clean up of the outside of the rod blank of any adhesive and let the adhesive setup. Then, I do the end of outer sleeve thread wrap and thread coating work. Most times the total repair takes about 30 minutes - excluding drying time for adhesive and thread finish.

The vast majority of the repairs have a negligible effect on the fishing characteristic of the fishing rod.

Options: ReplyQuote
Re: Rod repair
Posted by: Kerry Hansen (---.wavecable.com)
Date: December 24, 2022 09:15PM

I use the inner plug more for blank alignment except as Roger says for split break other wise it is short. For the outer sleeve I taper the ends for appearance, easy thread climb and a gradient in strength and overlap the break about an inch plus the taper. I use rod bond because I am not in a hurry and the stuff has always worked for me so don't see the need to change. I only use Glass, which I have a fair amount in both thin and thick wall which I will select based on location of the break.

Options: ReplyQuote


Sorry, only registered users may post in this forum.
Webmaster