- Article and Photos By Steve Hudson
(This article orginally appeared in RodMaker Magazine, Volume 3 #3)
Making your own device for finding rod spine is not only easy and inexpensive, but adds a valuable tool to your rod building arsenal as well.
 Making your own device for finding rod spine is not only easy and inexpensive, but adds a valuable tool to your rod building arsenal as well.
If there is one word that is used more than any other when rod builders gather to talk, it is probably spine. What you do with the spine of a rod can have a significant impact on how the rod casts and one thing that distinguishes a custom rod from many factory rods is the careful attention given to locating and utilizing a blank's spine.
The question of what to do with the spine is one that draws animated opinions but has no easy answer. Still, you can't do anything with a blank's spine until you know where the spine is.
So how do you find this rod spine? The time-honored way is to roll the blank, under a light bending load, on a table or other flat surface. The butt end of the blank rests on the table, while the tip is supported by a finger. Gentle downward pressure is applied to the center of the blank, which then tries to rotate itself into what one of my mechanically-inclined buddies calls a "dynamically stable position." When it does, the outside of the curve is what's known as the spine.
The so called table-top-and-fingers method works fine in most cases. However, there are blanks that don't yield a distinct spine when treated to this method. Others like to skitter around, sometimes jumping from the table to the dismay of passers-by and nearby cats.
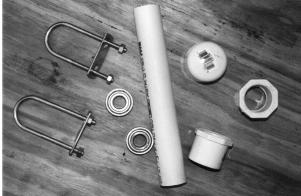 photo 1 - The needed parts for assembling your own spine finder.
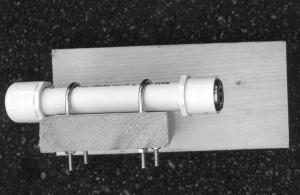 photo 2 - A top view of the “homebrew” spine finder. Note the offset of the upright and position of the upright on the base. This creates a stable platform for your spine finding endeavors.
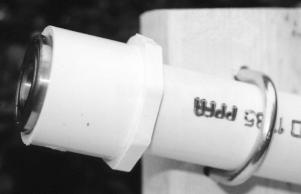 photo 3 - Close-up of the forward ball bearing and how it fits into the front coupling.
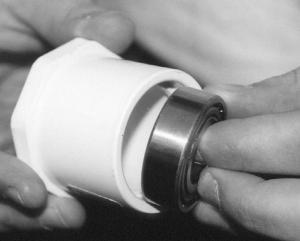 photo 4 - Inserting a bearing into the end fitting.
 photo 5 - The rear bearing secured into the rear fitting. It is a press fit, although any play could be taken up with a tape shim.
|
A better approach is to use a spine finder and that's what this discussion is about. To understand the "how" of building spine finders, you should first understand how and why they work as they do. There's nothing very mysterious here; in fact, every version I've seen works essentially the same way. At the heart of most designs is a pair of smooth-turning ball bearings. The bearings are mounted in a manner which allows them to support the butt end of a blank. Then, when the tip end of the blank is loaded (by the simple expedient of pressing on it with a finger) the bearings allow the blank to wake up and rotate into that stable position, with the outside of the curve conveniently on top. The builder can then mark the outside of the curve as the "spine" of the blank — and use that information during subsequent construction of the rod.
It's not hard to build a spine finder. The parts, for the most part, are easy to find and not too expensive; in fact, depending on your ingenuity and resourcefulness, you should be able to build the whole thing for the cost of a decent lunch.
Getting Your Bearings
Start by acquiring a set of suitable ball bearing assemblies. The dimensions of those bearings will determine the sizes of everything else, so have them in hand early in the game. The bearings you want feature a little ring which rotates inside a bigger ring. In this application, one bearing assembly is mounted at each end of a hollow tube with the bigger outside ring secured in place. During the spining operation, the rod blank rides inside the inner rings, which allow it to rotate freely as one end is deflected. Obviously, the inside diameter of the assembly has to be big enough to pass the biggest blank you plan to evaluate.
Where do you get suitable bearings? One of my spine finders is built using a set of small (1 in. outside diameter) hardware-store bearings that cost about $2.00. Another is built using a set of large 2 in. outside diameter bearings that I ran across up at a surplus store for about $3 apiece. Both versions work fine. You can also check under "bearings" in the business pages. Who knows? You might even find an industrial supplier who will give you a couple of samples for free!
It goes without saying that the bearings you choose should rotate smoothly. This shouldn't be a problem with new bearings, but before you purchase surplus bearings give them a few spins to make sure everything rotates as it should.
You should also polish the inside of your bearings with fine and extra fine sanding cloth to remove any sharp edges that might mar your blanks.
Your choice of bearings is non-critical as long as they turn smoothly and as long as you have a suitable way to mount them without hindering their rotation. Your mounting system should also allow adequate space between the bearings. Typically, that should be five to ten inches, with smaller spacings for spining shorter blanks.
Another consideration is constructability. When I started the spine finder project, I had visions of a beautifully finished walnut bearing support system, its rich wood tones providing just the proper ambiance for a lofty craft such as rod building. It would be something to behold, admired by one and all. But then I thought of all the hours it would take to make it and so I began to look for an alternative.
Bearing Support
I'm a great believer in PVC pipe, it's cheap, plentiful, and easy to work. The plan was to use a piece of PVC pipe as the main body of my spine finder. Thus, my first stop was the local hardware store's plumbing section. Bearings in hand, I walked the aisles looking for inspiration and a proper fit.
When selecting PVC pipe for spine finder use, look for pipe with an outside diameter the same as, or slightly larger than, the outside diameter of your chosen bearings. Given the choice, buy thick-walled pipe for added durability. Then pick suitable off-the-shelf PVC fittings to hold the bearings in place.
When choosing fittings to secure your bearings, you may need to exercise a little creative thinking.
For the closed end of the assembly, you may be able to simply select an appropriate end cap, sandwiching the bearing between the cap and the end of the pipe.
For the open end, it's a little more complicated. One possibility is to use another end cap, cutting a hole in the end of it before assembly to allow clear passage of the rod blank. This approach works very well if you don't mind the task of cutting a hole in the cap. To make the opening, first drill a large hole in the end of the cap. Then use a round rattail file to enlarge the hole as required. It's not a major undertaking, as PVC is soft and works easily with ordinary wood rasps.
Another approach is to look for fittings that are already open. That's what I did when building one recent spine finder. You can often find some combination of fittings that will secure the bearing while also fitting securely on the main spine finder barrel.
Perhaps the ultimate variation is to build a spine finder with interchangeable endcaps that can be used on a number of different barrels. That's the approach I took on my "deluxe" model, mounting the bearings in removable end cap assemblies that friction-fit onto the main body tube. I use a short tube, just a few inches long, for spining short sections of multi-piece blanks and then have the option of switching to a longer tube for spining some longer blanks. Of course, the short tube will work on the longer blanks too.
Last Minute Discovery
As I headed for the check-out with all my treasures in hand, something else caught my eye - a $2 compression coupling, actually nothing more than a short length of PVC pipe threaded on each end and fitted with matching screw-on end caps. A little in-store experimenting revealed that my bearings fit nicely inside the end caps, which could be screwed tight to secure the bearings in place. Now that's convenience! Some plumbing engineer probably thought he was designing the perfect pipe coupler, but little did he know that he'd come up with the all-in-one heart of a rod spiner too!
There was just one complication. Since the coupler's end pieces were by design open on both ends, I knew I'd have to find a way to close one end off to keep the blank's butt end from slipping too far through. This was easily accomplished by the simple expedient of securing a flat piece of hard plastic inside one of the end caps. It did the job perfectly, and the resulting compact spine finder assembly is ideal for spining four and five-piece blank sections.
This particular hardware store also carried larger couplings of similar design. I picked up one of them, too, with the idea of using it with a pair of larger bearings to build an industrial-strength spine finder. Like its little brother, it too required a blocking plate over one of the open ends.
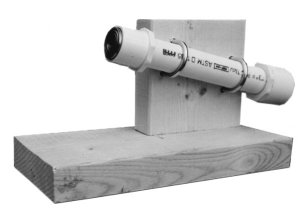
The Stand
After assembling these bearing holders, I couldn't wait to put ‘em through their paces. This I did, propping them in drawers or bribing the children to hold ‘em steady on the kitchen table. They all worked fine.
Spine finders work equally well in any position, but some positions are distinctly more convenient than others. Early in the game I'd decided that my spine finder should be oriented at an angle. I briefly considered making that angle adjustable but soon decided that wasn't worth the trouble. Instead, I settled on a very simple stand built from two pieces of scrap (as in free) lumber.
The illustrations show the general form of the stands I've used for each of my homebrew spine finders. The vertical piece holds the bearing support tube; the horizontal piece provides stability. Cutting the wood and putting it together takes about ten minutes; the joint between the pieces is glued-and-screwed for added durability. Note that I offset the vertical pieces toward one end and one side; this adds stability during spining.
To mount a bearing tube to its vertical support, I used a pair of U-bolts. One would probably have done the job, but a pair of them (one near each end of the tube) does it much more securely. Besides, they are not expensive. The ones I used cost $1.09 apiece.
I completed each assembly by marking and drilling holes for the U-bolts, then slipping the bolts over the bearing tube assembly and securing everything in place.
And that's all there is to it. A simple device to perform a simple function.
Putting It To Work
Using the rod spiner is simplicity itself. First, prepare the blank by wrapping a conveniently located piece of tape around it; this allows you mark the outside of the curve.
The blank to be spined is then inserted (butt end first) into the spiner until the butt end of the blank is supported by both bearings. Gentle downward pressure is then applied to the far end of the blank, bending it slightly, which causes the blank to rotate into a dynamically stable position. The smooth-turning bearings allow for easy rotation, so only a little downward pressure is required.
When spining a blank, remember that the spine finder finds the "effective spine" between the two outermost support points. The inner support point, the bearing located between the butt-end bearing and the downward-pressing finger, simply provides support.
What does this mean in practice? It means that for most accurate spine location, you must make sure that one end (the butt end) of the blank is supported by one of the bearings, while also making sure that downward pressure is applied at the extreme opposite end. If you apply downward pressure several inches back from the tip, the spine indication may change. The spine finder is still working as it should, finding the effective spine between the outermost supported points, but if those points are not at the ends of the blank section you won't be spining the whole blank.
Variations
As you can see, the idea behind a spine finder is straightforward. Lots of variations are possible, too, depending on the materials you have at hand.
One area where you can get especially creative is that of mounting the bearings. Depending on your bearings' outside diameter, for example, you may be able to simply press-fit them into the open ends of a short section of PVC pipe. It doesn't get any simpler than that!
Alternately, if the bearings are is just a hair small, you can use tape to build their outside diameter, then secure them with epoxy. Just be careful not to dribble epoxy into the bearing's inner works.
A portable spiner like the one described here is ideal for me, since my rod building bench is an industrial strength folding table that also serves several other purposes. But if you have a permanent rod building bench, you may want to consider some sort of permanent mounting scheme. I've seen this approach used in a number of commercial rod shops.
~ Steve Hudson
|
| |