- By Mike Barkley
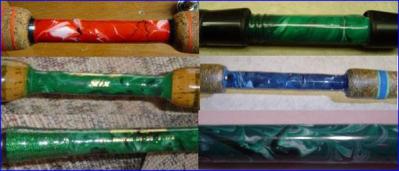
Want to create a rod that is a truly unique, one of a kind and impossible to duplicate? Try marbleizing!
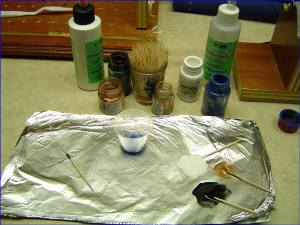
It is a fairly simple, inexpensive, method of adding a little creative "flair" to your next project. You can be subdued or as wild as you want. All you need is your favorite finish, some paint pigments and a supply of toothpicks.
The most popular pigment is TAP Resin Dyes (http://www.tapplastics.com/shop/product.php?pid=50&) They come in 8 different colors and are very inexpensive. Also, very popular are the Testor's model paints, which come in a wide assortment of colors (the metallic's are particularly striking). When using Testor's, I prefer to let the paint settle and pour off as much of the solvent as possible, leaving only the thicker pigment.
I'm sure that there are other suitable pigments out there, but for the purpose of this article, I will limit it to the things that I am familiar with and walk you through the way that I do it (which is definitely NOT the only way).
OK! Here we go.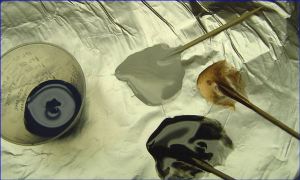 First, decide how many colors you will be using and have them ready. I then mix up a batch of finish and pour a small amount on to foil for each color that I am going to use. The finish for the main, or base, color, I leave in my mixing cup. I feel that a high build finish (I use LS High Build) works better when marbleizing simply because it covers and blends better First, decide how many colors you will be using and have them ready. I then mix up a batch of finish and pour a small amount on to foil for each color that I am going to use. The finish for the main, or base, color, I leave in my mixing cup. I feel that a high build finish (I use LS High Build) works better when marbleizing simply because it covers and blends better
Using a toothpick, I add tiny amounts of my pigments to each batch of epoxy until I get the colors that I want (You can mix pigment colors to get the shade/color that you want). Apply the Base coat finish as you normally do and leave it turn for a few minutes so that it levels nicely. With the rod turning, I use a toothpick and start adding small dabs of the next color, using the toothpick to draw the color through the base coat, creating swirl patterns to get the desired effect.
 Repeat this procedure with all of the colors until you get the desired results. Depending on the finish that you use, you may prefer to let your finish set up for a short time so that it does not all run together when you apply it. After it has been turning for a while, you can apply a LITTLE heat to get a more blended effect. The possible effects are endless! You can do anything from subtle marble to camo to your wildest nightmare. It can be used as a butt wrap, over guides, reel seats (make sure that your reel will still fit into the seat), in split grips and I'm sure, in places that I haven't even thought of. (One word of caution-Keep your dog away from Putter)
I let cure for 24 hours and apply a second coat of clear finish.
Repeat this procedure with all of the colors until you get the desired results. Depending on the finish that you use, you may prefer to let your finish set up for a short time so that it does not all run together when you apply it. After it has been turning for a while, you can apply a LITTLE heat to get a more blended effect. The possible effects are endless! You can do anything from subtle marble to camo to your wildest nightmare. It can be used as a butt wrap, over guides, reel seats (make sure that your reel will still fit into the seat), in split grips and I'm sure, in places that I haven't even thought of. (One word of caution-Keep your dog away from Putter)
I let cure for 24 hours and apply a second coat of clear finish.
There are a lot of builders doing some real neat stuff with marbleizing and I do want to make it very clear that I am in no way responsible for coming up with this unique process! I'm just letting you know how I do it (which, I'm sure, is not much different than the way that everyone else does it). There are lot's of great marble photo's on the Photo Page.
Grab a scrap blanks and play with it, Experiment and don't forget to post your pictures!!
~ Mike Barkley
|
| |