- By Rich Forhan
The advantages of single foot guides for high performance casting and
spinning rods are significant.
- Lighter �(& therefore more sensitive)
- Less flat spotting �(making the rod feel more alive!)
- Less thread and epoxy used �(less weight again)
- Shorter wrapping and epoxy time.
However, single foot guides have been considered best for light tackle
applications. �Not any more. �Fuji's new "J" ring series, sizes 6J, 7J, 8J,
& 10J have a shorter eye-to-leg distance which makes for a much stronger
guide. �This feature, combined with my locking wrap, should prove to be the
undoing of many double foot guides (pun intended).
Single foot guides should be considered for all applications short of heavy
saltwater use. �I tested a normal wrap, the security wrap (RodMaker Vol. 2,
#6, pages 16-17) and my locking wrap in an attempt to come up with the best
wrap possible for the Tournament Pros that use my rods (rather roughly
sometimes). �I wrapped a scrap piece of rod and tested the 3 wraps by
pulling the test piece out of my boat's rod locker and purposely hooking the
eye each time. �The results were enlightening. �The guide with the standard
wrap pulled out after 4 snags, the security wrapped guide pulled out after 8
snags. �My locking wrap never allowed the guide to be pulled out of the
epoxy! �After over 20 snags and pulls (which only tended to flatten the
guide against the blank) - the insert popped out from the treatment.
The Locking Wrap
Here's how to do my locking wrap. �Stop one wrap short of the guide leg and
then put in a tie-off loop (I use Berkley's Gorilla braid �- �30 lb test)
Now wrap one "blocking wrap" behind the guide (1). �(A blocking wrap is what
I term any wrap that is made beyond the guide leg/ring, as in the standard
single foot guide security wrap.) �This will effectively line up the locking
wraps to follow. �The "locking wrap" is made by coming behind the back of
the guide, then going back around the guide leg a full 360 degrees and then
continuing in the same direction as the other wraps (2 & 3). �These locking
wraps completely encircle the guide leg and guarantee the guide cannot be
pulled from the wrap. After 3 locking wraps are in position - use 2 blocking
wraps to finish (4). � After the 2 blocking wraps are made, tie-off in the
usual manner.
Once the threads are epoxied, the guide is now effectively prevented from
pulling out. �All three of the locking wraps would have to break before the
guide could be pulled out from under the thread. �Use a burnishing tool to
pack the threads closely together before using finish. �Properly executed,
the blocking wraps are hardly noticeable and do not in any way detract from
a neat appearance.
At first the going may be a little slow but in a short time one can do the
locking wrap with ease. �I use the locking wrap on all single foot guides
(both spinning and spiral wrap rods) to enhance durability. �The roughest
treatment can only flatten the guide or pop the insert out (never pulls the
guide out from under the thread). �Of course, if the insert is forced out,
the guide must be replaced. �It will usually take many blows to do this. �In
summary here are the 7 wraps that make up my locking wrap.
�
- Last wrap in front of leg/ring to secure tie-off loop
- Blocking wrap behind eye (serves to align the following wraps and prevent
gaps) � �
- 1st locking wrap
- 2nd locking wrap
- 3rd locking wrap
- 2nd blocking wrap behind eye
- 3rd blocking wrap (you can vary the number of "blocking" & "locking wraps"
as you see fit, although using more of either has not been proven to
increase durability any further.) -
�
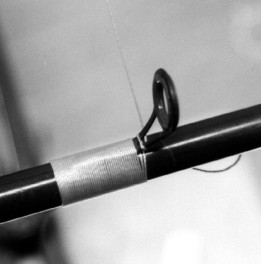
1. �Insert your tie-off loop about one wrap before you reach the guide ring
leg. �In the photo, the first "blocking" wrap has been made in the same
manner as in a normal single foot guide security wrap. �A second wrap is now
made but instead of continuing around the blank, it is brought around the
guide ring leg.
|
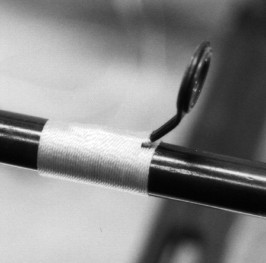
2. �The thread is brought completely around the guide leg in a 360 degree
circle. �In other words, it completely encircles the guide leg. �The thread
is then wrapped as normal around the blank and two more identical "locking"
wraps, also encircling the guide leg, are made.
|
3. �From this angle you can see the first "locking" wrap which completely
encircles the guide ring leg. �Again, this is done twice more for a total of
3 "locking" wraps around the guide leg. �Use your thumbnail or suitable
thread tool to pack these wraps against each other.
|
4. �After a total of 3 locking wraps have been made, the thread is wrapped
for 2 more turns in normal fashion and the wrap is tied off. �The finished
product finishes well and the locking wraps are almost unnoticeable. �The
guide is now securely locked into place. �
|
~Rich Forhan
|
| |